A Simple Overlooked Technique – Yet so Effective
Last week, Google+ announced that you can use animated gifs for your profile photo, and provided some search results on how to get started. Playing nicely with gifs is yet another feature that Google+ has over Facebook, and I believe gifs should be a regular part of your content creation arsenal.
Because of their incredible longevity (in internet years, they’re like a million years old), animated gifs are one of those internet curiosities that shouldn’t be ignored or dismissed as being just for kids. Yes, gifs can be annoying, especially when there are too many placed in close proximity of one another, but when used correctly, gifs can breathe life into otherwise static posts, and the possibilities for repurposing are immense.
With younger social media users, gifs are as popular as ever, if not moreso — If you’ve ever used Tumblr, you know exactly what I mean.
Twitter’s 6-second video app, Vine, sought to capitalize on the popularity of animated gifs by doing them one better and including audio, but I would argue that audio is the worst thing about Vine. Too much rustling wind and club noise dampens the experience for me.
Google+ makes adding an animated gif as your profile picture super easy — just upload it as if it were any other photo. But, making your gifs work for you isn’t always so simple. Here are a few examples and ideas for when to use them:
To use animated gifs inside of your WordPress blog posts, you’ll want to set up an account at one of the many photo hosting sites. I like Photobucket because of its ease of use — just keep in mind that it has a 5 MB file size limit. Once you upload your masterpiece to Photobucket, it will give you some link options, so click on “Direct Link” and your picture’s link will be automatically added to your clipboard:

Then, if you want to add the gif into a WordPress post, go to “Add Media,” and instead of uploading the gif, simply click on the “Insert from URL” option instead, and paste the Photobucket URL in the given space. Your gif should appear like so:

Once you click on the “Insert into Post” button, your gif should show up in your draft straightaway:

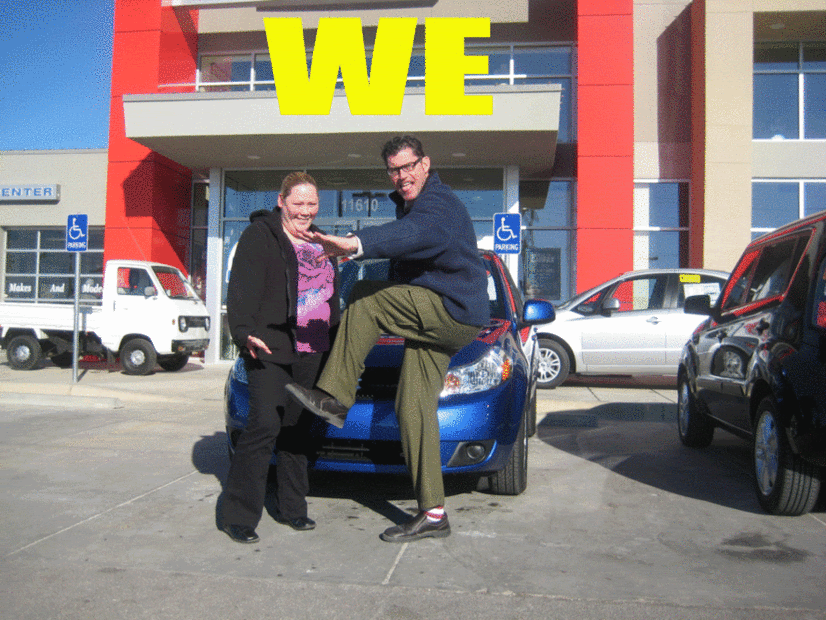
Gifs are a great way to capture some action when your subjects are too shy to speak on video. Let’s say your salesperson has great rapport with a sold customer, and you want to document it. The problem is, the customer isn’t hip to the idea of an interview. Ask for their agreement to pose for a picture in front of their new car, and then have them do a couple of poses. Perhaps they could pantomime a fight scene or some sweet dance moves.
The beauty of this is that almost any sequence of poses will look funny. Then, add in some flashing text and you’ve got the next best thing to video. In some cases, it might even be better! I’ve received a lot of positive feedback from customers and salespeople with this technique.

There are many online services that will slap together a gif out of the pictures you upload when you’re in a pinch, but learning how to put them together yourself is time well spent, as you’ll have much more control over the process. Most of the free online services don’t let you control how fast the images move, nor will they allow you to add text.
Made a video you’re proud of? Turn some of the more engaging scenes into gifs to get some extra mileage out of your production. If you have a copy of Photoshop (every dealership should), dropping your video file in and cropping it down to be gif ready doesn’t take long at all (see instructions below). Be careful about the dimensions of the image, and you want to limit the gif to 10-15 seconds of footage at the most.
This is a great way to use footage that didn’t make the final cut of a video, or those funny moments of goofing around that aren’t long enough to make a video of their own. I made this one out of a clip someone sent me from their phone:

If you want to convert a video clip to an animated gif in Photoshop, just follow these steps. Keep in mind I’m still using Photoshop CS4, so your version might look a bit different. The principles are the same, however:
1. Make sure the Animation Window is showing for your project by going to Window > Animation.

2. Open your desired video clip. You should see a timeline appear in the animation window below:

3. Use the markers in the animation window to isolate the frames of your video that you want to use. I like to keep it at ten seconds or less:

4. Select “Trim Document Duration to Work Area” from the menu in the upper right hand corner of the Animation Window, which will crop out the unwanted sections of your video:

5. If your video dimensions are large, you might want to resize the entire project to something manageable by going to Image>Image Size.
6. Click on File > Save for Web & Devices, and make sure GIF format is selected from the dropdown in the upper right hand corner:

7. Click save, and you’re all set!
To make a gif out of still pictures in Photoshop, check out this video tutorial, (there are many good ones online) which explains it better than I probably could.
If Google+ keeps adding little features like this, it just might end up being a fun place to spend some time. Will Facebook ever add the feature?
Can you think of some other applications for animated gifs in your dealership’s social media marketing mix?
Let me know in the comments box below!